Open topic with navigation
Vendor Codes Table
 Overview
Vendor Codes Table
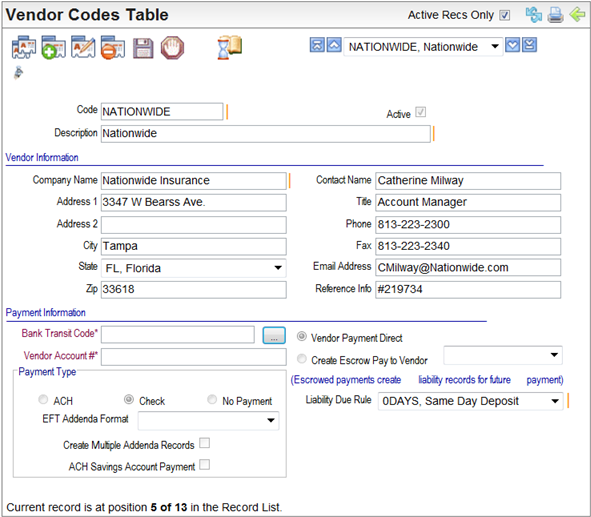
Fields on the Vendor Codes Table
- Code.
Enter a Code, of ten characters or less
with no spaces or special characters.
- Description. Enter
a Description of the code.
- Active? An
active code has the Active checkbox selected, making the code available
and keeping the code in effect as a valid choice.
Vendor Information
- Company Name. Enter
the Company Name of the vendor.
- Enter the mailing
address for the vendor: Address 1,
Address 2 (optional), City,
State, and Zip.
- Enter contact information
for the vendor: Contact Name, Title (of contact), Phone,
Fax, E-mail
Address, and Reference Info.
Payment Information
Define whether the vendor's payment is paid through
the system in the payroll process or is escrowed and paid through payment
liabilities for future payment.
- Vendor Payment Direct. For
a direct payment, choose Vendor Payment
Direct. A Vendor Payment Direct
with a Check or ACH payment can be generated from the organization’s bank
account during payroll processing.
- Create Escrow Pay to Vendor. To
escrow the liability for future payment, select Create
Escrow Pay to Vendor, and select the following:
- Vendor code for the escrow vendor
- Liability Due Rule.
The liability due rule defines the schedule for future payment of the
escrowed liability.
Payment Type
- Define the payment
type. If the payment will be paid "direct" and from the system,
select the Check or ACH
button.
- Check.
If the organization will pay the liability through a check generated as part of payroll processing, select the Check option.
- ACH. If
the payment type is ACH, choose the ACH
option, and click on the ellipses button to complete the Vendor Account
# and Bank Transit Code. Enter the Bank Transit Number,
click on the Validate-> button,
and enter the Account Number.
Click on Ok to save the banking
information.
- No
Payment. If the organization will pay the liability through its in-house Accounts Payable system, select
the No Payment option, and leave
the Vendor Payment Direct option
selected.
- EFT Addenda Format. For vendors that require EFT remittance, such as some child support vendors, select the EFT Addenda Format.
- Create Multiple Addenda Records?
For a child support vendor, to enable ACH Credit TXP addenda records for employee-detail payments, select
the checkbox to "Create Multiple Addenda Records," and the ACH option for the payment type.
- ACH Savings Account Payment? To set the ACH account type to Savings for this vendor, select the "ACH Savings Account Payment" checkbox, and select the
ACH option for the payment type. This is often used if the vendor is specifically for depositing funds directly into employee-specific health or flexible savings accounts.
The default account type for an ACH payment is a Checking Account. Leave the "ACH Savings Account Payment" checkbox clear for any ACH payment that is being sent to a Checking account.