Open topic with navigation
Online Pay Entry Spreadsheet
 Overview

Detailed Pay Entry Spreadsheet
Buttons
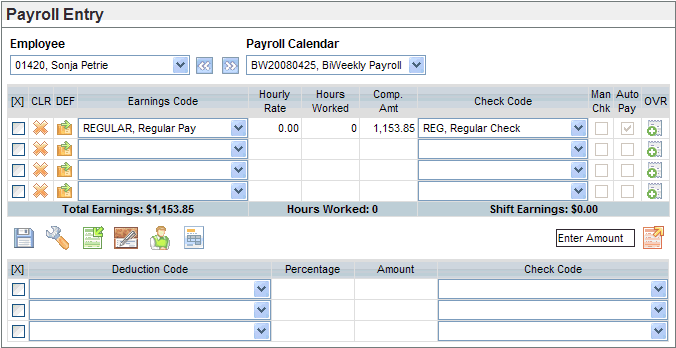
The following defines the buttons on the spreadsheet entry
screen.
 Delete a Row. To
clear or delete a row, click on the X-button in the CLR column. Remember
to save after you delete.
 Apply Defaults. To
apply a row of default entries from the preferences, click on the button
in the DEF column.
  Gross To Net. The
gross-to-net is calculated for that time entry row's check code. The check
calculation displays in read-only mode.
 Net to Gross. To
calculate a manual check for a net-to-gross amount, type the desired net
amount in the field to the left of the Net to Gross button, and then click
the Net to Gross button. The system
calculates net-to-gross and displays it as a manual check.
  Manual Check. To
see an on-demand check for the check code that is currently selected (based
on which row has a checkmark), click on the manual check button. The gross-to-net
is calculated for that time entry. The check-calculation screen displays
in edit mode.
 Profile Information. To
display the employee profile and calendar information in read-only mode
for the employee, click on the profile button.
 Batch Detail. To
see batch totals by User Group Code, click on the batch detail button
or press F10.
  Preferences. To
view or change the pay entry preferences,
click on the preferences button.
  Override.
To override
other values for a row, click on the button in the OVR column.
Checkbox Flags
The following checkboxes flag the row with the type of entry.
- Man Chk?
Is
the row for a manual check?
- Auto Pay?
Was
the row a result of the "Create Auto Pay" feature?
