Open topic with navigation
You are here: Reference > Wizards > Employee Termination Wizard
Employee Termination Wizard
 Overview
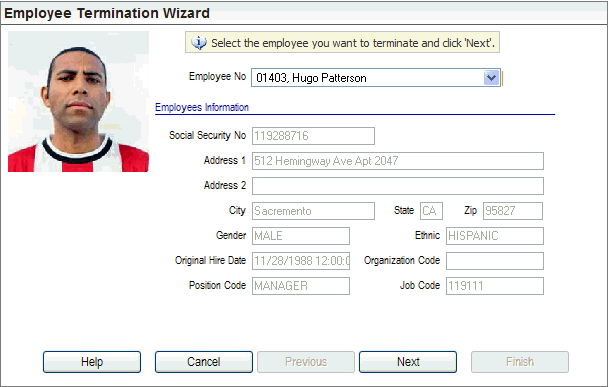
Employee Termination Wizard, Panel 1

Employee Termination Wizard, Panel 1
Terminate an Employee
Open the Termination Wizard.
Panel 1
On-Screen Instructions: Select
the employee you want to terminate and click 'Next'.
- Follow the on-screen
instructions. You may search for and select the employee to be terminated from the upper navigation bar. Confirm
that the correct employee is selected for termination. The "Employees
Information" section displays read-only employee information.
- Click Next.
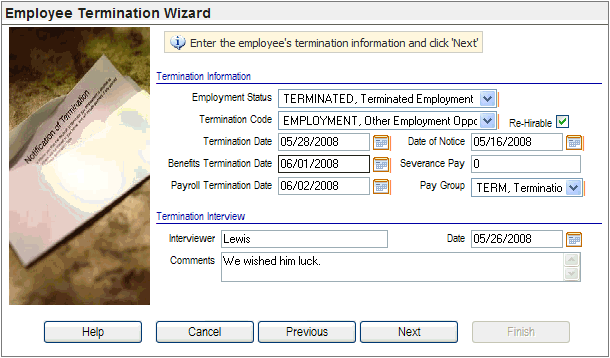
Panel 2
On-Screen Instructions: Enter
the employee's termination information and click 'Next'.
Termination Information
- Employment Status. Select
Employment Status (options populated
from the Employee Status Codes). The Employment Status will determine
the payroll processing status.
- Termination
Code. Select
the Termination Code.
- Termination
Date. Select
the Termination Date. The Termination Date will populate the
Employment tab, Position End date
and Job End date on the Assignment tab and the Employee Termination
Detail for HR.
- Benefits
Termination Date. Select
the Benefits Termination Date.
The Benefits
Termination Date populates the Termination
Date on the employee’s current Benefit Detail records.
- Payroll
Termination Date. Select the Payroll
Termination Date. The
Payroll Termination Date entered populates the End
Date on the employee's current, active records for Auto
Pay Detail, Net Pay Details;
and Deduction Detail records.
- Re-Hirable?
Select
Re-Hirable, if the employee can
be considered for future re-hire according to the organization's policies.
- Date
of Notice. Select
Date of Notice.
- Severance
Pay. Enter
the Severance Pay, if any, for
record-keeping purposes.
- Pay
Group. The Pay Group is
automatically selected. Edit the Pay
Group for the terminated employee according to your organization's
procedures. This
will allow termination processing to update the employee's Pay Group on
the master record.
Termination Interview
- Interviewer. Enter the termination
interview information, as applicable. Enter the interviewer's name in
the Interviewer field. Select
the Date of the interview. Enter
any comments or notes in the Comments
field.
- Next
button. Click Next.
The final
panel displays.
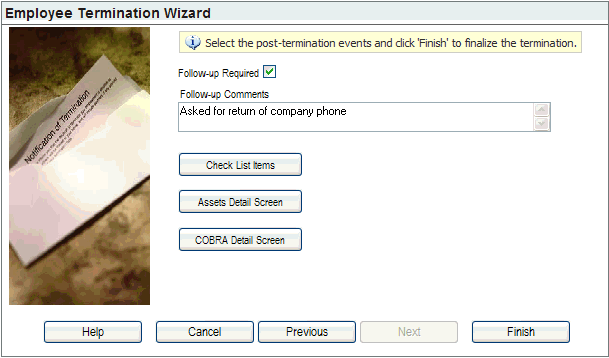
Panel 3
On-Screen Instructions: Select
the post-termination events and click 'Finish' to finalize the termination.
Post-termination events are available on the final panel
of the Termination Wizard: check list items, asset details, and COBRA
details.
- Follow-up
Required? If any follow-up is required, select the Follow-up Required checkbox.
- Follow-up
Comments. Enter any follow-up instructions or information
in the Follow-up Comments as applicable.
- Check
List Items. Search
the system for outstanding Benefits items, Deductions in arrears, and
Assets to be returned to the company. If the employee has no outstanding
benefits, deductions in arrears or assets to return, a message will display
stating, ‘There are no check list
items to display.’ If this employee
has any of this type of active record on their employee detail screens,
a window will appear with a selection list that you can use to view the
record.
- Assets
Detail Screen. Review
any assets that should be collected to be collected or paid for, such
as laptops, cellular phones, etc. A message may display if an employee
has not returned one or more assets. If the employee has asset records
within the system to be returned upon termination, clicking on this button
will display the Assets Detail screen for the employee. Verify each Assets
Detail record for the employee, and update an employee’s asset assignments
on the Employee Assets Detail.
If an asset is not returned or returned at a lesser value, do not close
out the asset yet. If your company’s
policy recovers the asset value from the final paycheck of an employee,
inform the payroll department.
- COBRA
Detail Screen. When
you click on COBRA Detail, the
Employee COBRA Detail opens. Complete the COBRA detail.
Review the details of COBRA coverage availability for this employee. The
information entered on the Employee COBRA Detail provides information
for the COBRA Notification and Election letter. Add or edit records as
needed. For roles configured with access to the COBRA Notification and
Election Letter, the COBRA Notification and Election
Letter can be printed later from the Report Navigator or from a Report
Selection screen where this report is configured as one of the options.
- Finish button. Complete
the Employee Termination Wizard. After completing the Employee Termination
Wizard, return to the Employee Master and Employee Detail screens prior
to the final payroll check creation and verify the information.
Click Finish.
Result: A dialog prompts, "Are you sure you wish to terminate employee ‘[Employee
Number, Last name, First name]’?" Click Yes
to process the termination. Results: A
second message appears telling you the employee has been successfully
terminated.
The results of the Employee Termination wizard are
described in the Overview topic for Employee Terminations.
Employee Termination Wizard, Panel 2

Employee Termination Wizard, Panel 2
Employee Termination Wizard, Panel 3

Employee Termination Wizard, Panel 3


