Open topic with navigation
Employee Net Pay Detail
 Overview

Employee Net Pay Detail
Step-by-step instructions for how to add
a direct deposit for an employee, are available from the Add
an Employee Direct Deposit topic.
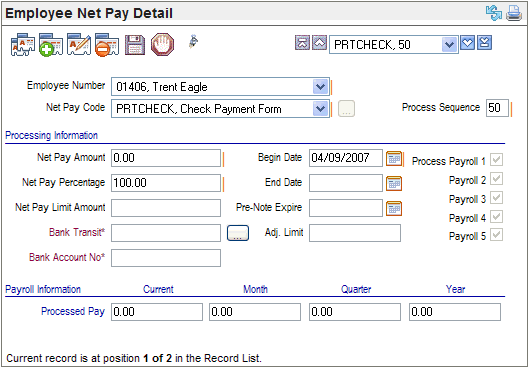
Fields on the Employee Net Pay
Detail
- Employee
Number. The
employee whose net pay detail information is defined on this record is
seen in the Employee Number field.
When editing a Net Pay Detail, restrictions prohibit changing the selected
employee.
- Net
Pay Code. The
Net Pay Code field defines processing information including whether to
generate a paycheck or to process a direct deposit (electronic transfer
of funds) for the net pay. When you add an Employee Net Pay Detail, select
a Net Pay Code. When editing a Net Pay Detail, restrictions prohibit changing
the selected Net Pay Code.
To view the Net Pay code in a secondary window,
click on the ellipsis button  at the end of the Net Pay Code field.
- Process
Sequence. When
you select the Net Pay Code, the Process Sequence number populates
from the Net Pay Codes Table. Net pay details with a lower process sequence
number process before those with a greater process sequence number.
Processing Information
On the Employee Net Pay Detail, enter a specific Net Pay
Amount or enter a Percentage of the total net pay for this particular
Net Pay Detail record. If you enter an amount, enter 0 in the percentage
field. If you enter a percentage, enter 0 as the amount.
- Net
Pay Amount. A
dollar amount for the net pay. If the Percentage field has a value, this
entry may be 0.00.
- Net
Pay Percentage. The
percentage of the total net pay for this particular Net Pay Detail record.
When the net pay record is the preferred net pay for all of the net pay
or has the highest net pay sequence number, enter 100.00 as the percentage.
Processing Information for Direct Deposits
If this Net Pay is a direct deposit, the employee's bank
transit number and bank account number must be completed. Entering a Pre-Note
Expire (date) is recommended for a direct deposit.
- Pre-Note
Expire. The
date to end pre-note processing for a net pay. A Pre-Note Expire date
is compared to the check date for the employee payment.
To put a pre-note in effect for the next payroll,
go to the Employee Net Pay Detail before processing the next payroll,
and enter a Pre-Note Expire date that is after the next check date and
before the check date for the subsequent payroll.
To end a pre-note for the next payroll, enter
a Pre-Note Expire Date that is before the next check date, or delete the
Pre-Note Expiration date.
Avoid entering a Pre-Note Expiration Date on
the Check Date for the next payroll. When the Pre-Note Expire date is
the same date as the Check Date, no pre-note processes and no direct deposit
processes for that check date.
See the Pre-Note topic
for more information.
- Bank
Transit*andBank
Account No*. Select
the Bank Transit field's ellipses
button to modify the Bank Transit*
and Bank Account No* values. After
a validation check, the Bank Transit*
and Bank Account No* fields populate
with the information supplied on the Bank
Transit Validation dialog box.
- For a direct deposit,
the online Employee Net Pay Detail shows the Bank Name.
- Begin
Date. Each
net pay requires a start date. Complete the Begin
Date field by entering or selecting the start date.
- End
Date. To
stop a net pay from processing as of a set date, complete the End
Date field.
- Process
Payroll 1 through 5? Select
the Process Payroll numbers for
every payroll of the month that this net pay applies to.
- Adj.
Limit. The
system will update the adjusted limit in the
Adj. Limit field to reflect changes to the current limit when a
payroll that pays this Net Pay to the employee posts.
Payroll Information
After the Net Pay processes, the Payroll Information
section of the Employee Net Pay Detail display the Current, Month to Date,
Quarter to Date, and Year to Date Totals.
The payroll accumulator selection on each pay run's
Payroll Calendar will cause these amounts to update and reset accordingly.

![]() at the end of the Net Pay Code field.
at the end of the Net Pay Code field.