Open topic with navigation
You are here: Reference > Wizards > Employee New Hire Wizard
New Hire Wizard
 Overview
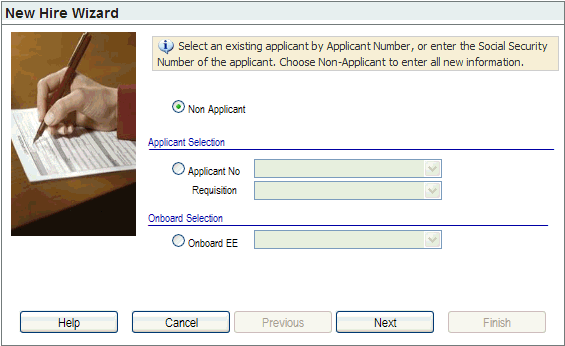
Panel 1, New Hire Wizard
Hire a New Employee
Complete all relevant information in the Employee
New Hire Wizard. Entries automate the creation of records and reduce
later data entry.
Panel
1

Panel 1, New Hire Wizard (Reduced Size)
- Open the New Hire Wizard. Follow the on-screen
instructions.
On-Screen Instructions:
Select
an existing applicant by Applicant Number, or select an onboarded employee.
Choose Non Applicant to enter all new information.
- Non-Applicants
lack an applicant record in the system. The
Non-Applicant
option is selected by default. For a non-applicant, leave the Non-Applicant option selected and click
Next.
- Applicants:
- For a candidate to be selected for new hire, the candidate needs to have a record in the Recruitment module and to have not been hired yet.
- For a corresponding requisition to be selected, the candidate's record needs to be set as hirable in the Recruitment module and the candidate needs to be associated with that Requisition.
- Onboard
EEs are individuals with an onboard record. On the rest of the
process screens, any information from and about the this individual that was finalized through the onboard processes is automatically available. (Assigning
self-service onboarding is a feature of Payroll & HR Enterprise.)
Note:
If you
don't complete required fields, and you click on Next,
then system will highlight the required fields until you complete the
required entries and continue.
Click on Next to
continue.
Panel 2
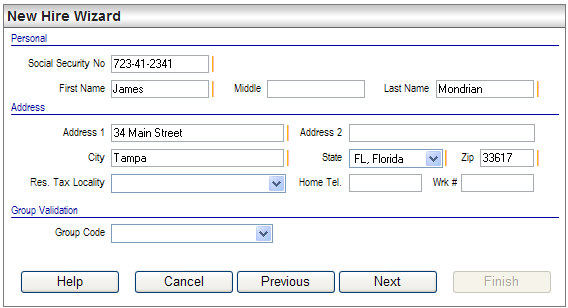
New Hire Wizard: Personal and Address
Address
- Social
Security No (required). Type
the new hire's Social Security number. See Social Security
Number validation rules for more information.
- First
Name, Middle name, and
Last Name.
Verify
or enter the new hire's First Name, Middle name, and Last Name. First
and Last Name are required.
- Card
Number (optional). A
card number for a time system can be entered for reporting purposes. If
your organization uses a SwipeClock®
integration, enter the Employee Number (defined on Panel 6) in the card
number field.
Verify (or enter) the new employee's primary home
address in the fields provided: Address 1, Address 2, City, State, and
Zip.
- Home
Tel. Enter
the home telephone number for the master record.
- Wrk
#. Enter
the new work telephone number for the master record and self-service phone
listing.
- Group
Code. Select
the Group Code for the validation group to which this employee will be
assigned (optional). Your system administrator sets up Group Codes to
allow employees to be grouped into codes to customize their available
validation code selections.
Click Next to continue.
Panel 3
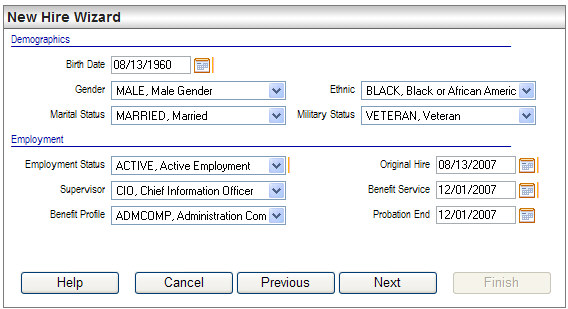
New Hire Wizard: Demographics and Employment
Demographics
- The Demographics
section migrate information to the Demographics tab within the Employee
Master. Demographic information can be automatically completed from the
applicant record, completed in the wizard screen, or completed later in
the Employee Master.
- Birth
Date, Gender, Marital
Status. Complete
the new hires Birth Date, Gender, Marital
Status where this information did not populate from the Applicant
module.
- Ethic.
Where available,
select Ethnic origin. This is
for EEO reporting.
- Military
Status. This
is for EEO reporting.
Employment
- Employment
Status. Select
the new hire's employment status.
- Supervisor. Select
the supervisor code.
- Benefit
Profile. Select
the Benefit Profile for the benefit
package that this employee will qualify for on the Benefit Service Date
(not required, but selecting a Benefit
Profile during the New Hire Wizard's process can automate the benefit
assignment process).
- Original
Hire Date. Verify
the Original Hire Date. The system
populates the new employee's Original Hire date with the current system
date. Edit this field as necessary to define the actual date that this
employee was first hired. Result: The
Original Hire date will be used to track an employees length of service.
- Benefit
Service. Enter
the benefit service start date according to your organization's benefit
policies. This date is used to begin any benefits for the benefit profile
that are defined to auto-create. The Benefit Service date may be the same
as the Original Hire date, or may be another date according to your organization's
policies.
- Probation
End. Enter
the Probation End date according
to your organization's policies. Many organizations use a standard 90-day
probation period based on the Original Hire Date.
Click Next to continue.
The next step is used to enter some of the payroll and compensation information.
Panel 4
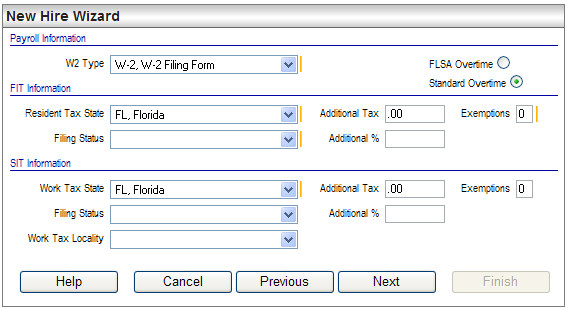
New
Hire Wizard: FIT and SIT
Payroll Information
- Complete the payroll
and tax information.
- W2
Type. In
the Payroll Information section, select the W2
Type filing form this employee receives at the end of the year.
Typically, this is W2, which is the default selection.
- FLSA
Overtime or Standard Overtime. Select
the type of overtime that applies to this employee: FLSA
Overtime or Standard Overtime.
FLSA overtime is for Fair Labor Standard Act (FLSA) overtime. To enable
FLSA overtime calculations, FLSA overtime should be selected on the employee's
master record. Result: The overtime selection
determines the selection on the employee's master record, where the option
can be edited.
FIT Information
For the FIT Information section, complete federal
income tax information.
- Resident
Tax State. Select
the Resident Tax State (the state
where this new hire resides). The Resident Tax State usually defines the
state government to which the employee is liable for withholding taxes.
- Filing
Status. Select
the new hire's declared federal tax Filing
Status.
- Additional
Tax. Enter
any additional tax amount, which will be added to the taxes withheld from
the tax tables during payroll processing. Result:
Additional Tax Withholding information for FIT flows to the Employee Tax
Detail for federal income tax.
- Additional
%. Enter
any additional tax percentage, which will be added to the taxes withheld
from the tax tables during payroll processing. Result:
Additional Tax Withholding information for FIT flows to the Employee Tax
Detail for federal income tax.
- Exemptions
(required). Enter
the number of tax Exemptions as
declared on the new hire's W-4.
SIT
Information
- Work Tax State. Complete
the state tax information. Select the new hire's Work
Tax State, which may differ from the Resident Tax State completed
in the previous section. The Work Tax State is the state in which this
employee actually works. This is used to determine the state unemployment
insurance record.
Note: If
the employee resides and works in the same state, the Resident Tax State
on the FIT Information and the Work Tax State on the SIT Information are
the same.
- Filing Status. Select
the new hire's declared state tax Filing
Status.
- Additional
Tax. Enter
any additional tax amount for state income tax, which will be added to
the taxes withheld. Result: Additional Tax
Withholding information entered here for SIT flows to the Payroll Detail
screen for Taxes.
- Additional %. Enter any additional
tax percentage for state income tax, which will be added to the taxes
withheld. Result: Additional Tax Withholding
information for SIT flows to the Employee Tax Detail for the selected
state.
- Exemptions.
Enter the number of state tax Exemptions as declared on the new
hire's State Withholding Certificate (or W-4 if the state doesn't require
a separate withholding certificate).
After the new hire, add any
additional Employee Tax Detail records needed. Confirm compliance with
state withholding laws. An employee residing in one state and working
in another may be liable for withholding taxes in both states and filing
a Non-Resident State Tax Return at year-end.
Local
Information
- Work Tax Locality.
Select the work tax locality
if a non-resident tax locality applies.
- Resident Tax Locality. Select
the resident tax locality if a resident tax locality applies. During new
hire processing, the resident tax locality selection directs creation
of a resident local tax detail for the employee and populates the resident
tax locality on the employee master.
- School District.
Select
the school locality to assign an employee to a school district tax locality.
Click Next to continue.
Panel 5
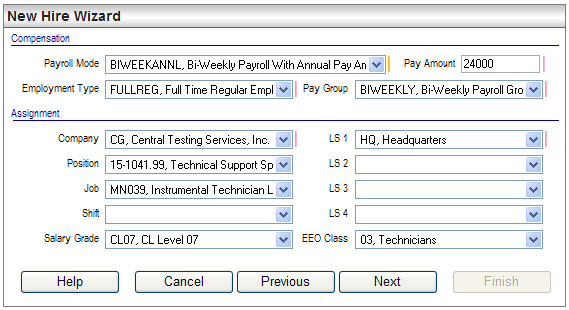
New Hire Wizard: Compensation
and Assignment Information
Compensation
- Compensation fields
are critical to payroll processing and should be completed with care.
Compensation fields calculate the Annual Pay, Pay Period Pay, and Hourly
Pay found in the Compensation tab within the Employee Master.
- Payroll
Mode. To define pay frequency and whether the pay amount
is hourly or annual, select the payroll mode.
- Pay
Amount. Define
the pay amount in dollars and cents.
- Employment
Type. To
identify the type of employment, including W-2 or 1099 status, select
the employment type.
- Pay
Group. To
determine which group of employees the employee is paid along with during
payroll, select the pay group assignment.
- Create
New Position? To
create a new position code from the information on this new hire, select
the "Create New Position" checkbox.
- Create
Auto Pay? To
create an Employee Auto Pay detail during new hire processing, select
the "Create Auto Pay" checkbox.
Assignment
The Assignment section will populate fields
found on the Assignment tab within the Employee Master record.
- Company.
Select
the Company. Result:The Company
selected here helps determine which tax codes are automatically assigned
to this employee at new hire.
- Job
Code. Select
the job code.
- Position
Code. Select
the position or define a new position code. Where the "Create New
Position" checkbox isn't selected, select an existing position code.
Where the "Create New Position" checkbox is selected, enter
the new Position Code.
- Shift
Code. Select
the primary shift code, if any.
- Salary
Grade. Select
the Salary Grade determined by
the new employee's annual salary and position. Result:
Where the Salary Grade is completed, then the Salary Grade generates
a value that indicates where this employee's salary falls within the company
range, which can be seen on the Compensation tab within the Employee Master.
- Workers
Comp. The
Workers Compensation classification can be identified by this Workers
Compensation Rate code selection.
- Job
Title. The Job Title is a free text field to define the new hire's
job title. This may auto-populate after the Position Code is selected
and can still be edited as needed.
- Labor
Seg 1 (required). Select
the labor segment 1.
- Labor Seg 2 through Labor Seg 4.
Select
additional labor segment levels as needed. Labor segments associate organizational
units with budget distribution, payroll accounting, and financial reporting.
- EEO
Class. Select
the EEO Class if the EEO class
doesn't populate or requires editing.
- Review
Freq. Select
the review frequency for performance reviews.
- Talent
Profile. To
assign a talent profile. This field is reserved for future functionality.
- Performance
Profile. To
assign a performance profile. This field is reserved for future functionality.
Click Next to continue.
If position control is activated, clicking
Next checks the budget for the position. If this new hire will cause the
budgeted dollars or FTE allocation to be exceeded, a warning prompt displays.
Click OK. If you would like to make a change, return to the previous step
to change the new hire's assigned position or cancel the new hire.
Panel 6
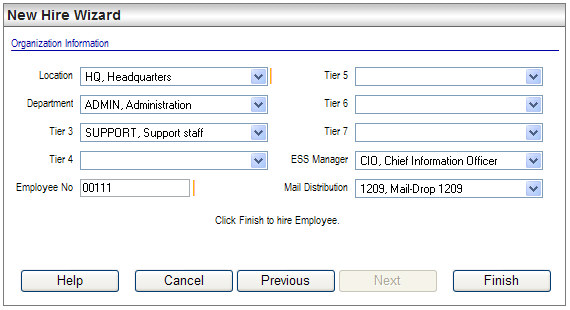
New Hire Wizard, Panel 6
Organization Information
- Fields on this
screen populate fields on the Assignment tab within the Employee Master.
Select the appropriate organization tiers for the new hire's position
in the organization. Each employee must be assigned to organizational
(tier) levels within the organization for HR purposes.
- Location
(required).
Select
the location code. A location assignment may determine what accounts are
used to pay an employee.
- Department. Select
the department code.
- Tier
3 through 4.
Select
tiers 3 through 4 as needed.
- Employee
No. Optionally,
edit the Employee No (Employee
Number) as needed. The new hire wizard automatically populates the Employee
Number field with the next available number. You may enter another unique
number can be assigned as the new hire's Employee Number. Result: The Employee Number cannot be edited later.
- Tier
5 through 7.
Select
tiers 5 through 7 as needed.
- ESS
Manager. Assign
an Employee Self Service Manager to the employee.
Result: The assigned
supervisor who is the employee's ESS Manager will have authorization to
view and update records for the employee if Manager Self Service is used.
- Supervisor.
Assign
the supervisor or manager that the new hire directly reports to.
- Mail
Distribution Code. The
mail distribution determines check sorting.
- Mail
Distribution Code. The
mail distribution determines check sorting.
- Click Finish
to hire the new hire into the system. Result:
A system prompt displays to verify that you wish to hire this employee.
- Click OK.
Results: If
you click on the OK button in
response to the prompt, the system will process the new hire. The new
hire may take a few moments to process.
When the employee is successfully added to the
system, a confirmation message box displays. The wizard migrates the entered
information into a new Employee Master record with an Employee Number
and an Employee Identifier of
1.
- Click OK.
New Hire Prompt

New Hire Message
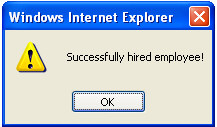
New Hire Prompt
New Hire Confirmation and Access to Payroll Details at
the End of the New Hire Process
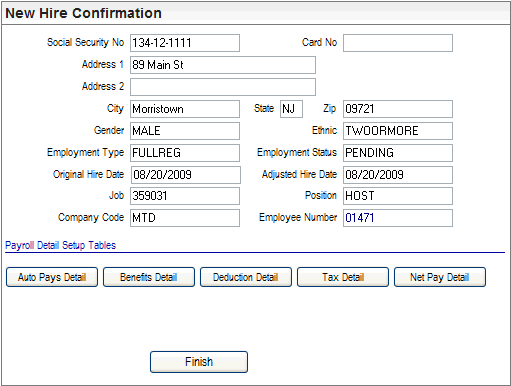
New Hire Confirmation and Details
- Click on a button
to open the detail screen. Add and edit relevant detail records as needed.
Have a payroll-knowledgeable person complete or review the Payroll New
Hire Details for each new hire. To close the detail's secondary window,
click on the cancel button in
its right corner.
- Click Finish.
Results: The
wizard will ask if you would like to hire another employee.
You may opt to click OK
to return to the first Panel of the New Hire Wizard. Otherwise, click
Cancel. Later, navigate to the
Employee Master, verify and enter further information as needed.
The results of the Employee New Hire wizard are described
in the Overview topic for New Hires.


