Open topic with navigation
You are here: Reference > Payroll Processing Screens > Pay Grid Entry Instructions
Pay Grid Entry Instructions
 Overview
Navigate to the pay entry grid.

Pay Grid Entry
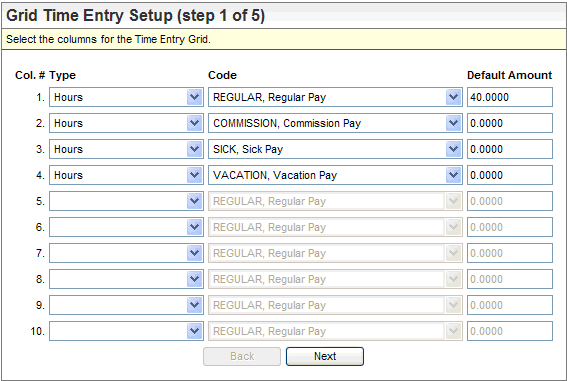
On-Screen Instructions: Select
the columns for the Time Entry Grid.
The pay entry grid opens to the first setup page. The first
two pages define the grid and the employee listing.
- Define
at least one row. Choose Hours or Comp. as the Type for
the first column (required). Choose the Earning.
The Earning field's selections populate
from the Earnings Codes Table. Enter a Default number if preferred.
Define remaining columns as preferred or leave
remaining columns blank. Choose the Type (Hours, Comp., or Deduction)
and choose the corresponding Earning or Deduction
code. Select an earning for "Hours" or "Comp." type,
or select a deduction for the "Deduction" type. Enter a default
number if preferred.
- Scroll down, and
click Next.
On-Screen Instructions:
Select
the layout, sorting, and filtering preferences for the Time Entry Grid.
- Select the layout
settings as desired.
- EE's
per Page. Enter the number of employees to display per page (between 6 and 12) in the
EE's per Page field.
- Rows
per EE. Choose the number of rows to display per employee (between 1 and 6) in the Rows
per EE field.
- Choose the sort order for employees: Location, Department, Last-Name-First, or Social
Security. Select the Sort Field 1. Define Sort Field 1 and
Sort Field 2 as preferred or leave blank. Avoid selecting the same
sort criteria twice.
- Define the filter
settings as needed. Apply a Location Filter, Department Filter,
and/or Pay Group Filter as needed.
- Click Next.
On-Screen Instructions:
Enter the
time data for each Employee.
- Enter values for
employees per column as needed. You can use the tab key to move from field
to field in the grid.
- To override labor
distributions, work state, or tax locality, click on the OVR button,
complete the overrides, and click OK.
- To view the next
page, click Next. Repeat steps 7 through 9 until the totals page
displays. (To return to grid pay entry setup page 2, click Start Over.)
On-Screen Instructions:
Review
the Time Entry totals.
- Review the totals.
Totals display per column, and subtotals are grouped by labor distribution.
- To continue, click
Next.
On-Screen Instructions:
Select
the Pay Calendar and post the time.
- Finalize the employee
grid time data by defining the payroll information.
- Payroll Calendar. Select
the Payroll Calendar for this
time.
- Check Code. Select
the Check Code.
- User Group Code. Type
the User Group Code (optional
with three character limit.)
- Create
Minimum Wage Makeup? Minimum Wage Earning Code. Choose
whether or not to enable makeup minimum wage calculations. To enable makeup
minimum wage calculations, select the checkbox for Create Minimum Wage
Makeup and select or verify the Minimum Wage Earning Code.
- Min
Wage Overtime. For
pay grid entry that includes overtime earnings for tipped employees who
have a standard pay rate that is less than minimum wage, such as some
restaurant employees, also select the earning for the minimum wage overtime
code: Min Wage Overtime (earning code for overtime
processing based on a calculated regular rate of pay). The rate factor
used will be from the selected overtime earnings code.
- Delete
Previous Time Grid Data? Optionally,
choose to delete the processed grid time for the same payroll calendar
and other criteria by selecting the checkbox for Delete Previous Time
Grid Data.
Note: Do
not select this option if you are entering time by location or department.
- Post
EE Grid Time Data. To
finalize the time, click on Post EE Grid Time Data. (You may return
to the previous page by clicking on Back.) A dialog box prompts,
"Are you sure you wish to finalize this time data."
- Click on OK
to continue and finalize the time data. Result:
The finalize grid time data process initiates. When the processing completes,
the grid pay entry screen closes. The time is available from the pay
entry spreadsheet.
Results of Finalized Grid Time
The processed time migrates to the pay entry spreadsheet
for the selected payroll calendar. Time, pay, and deduction information
entered through the grid may be modified or deleted per employee and row
on the pay entry spreadsheet.
Advanced Scenarios
Multiple Batches
>Multiple batches of grid time may be processed
for the same payroll.
Delete Previous Batch Option
A user may opt to delete a similar batch
of grid time when processing a similar set of time (payroll calendar,
user group code, etc.). Do not opt to delete the previous batch if you
are entering time by location or department.
Troubleshooting Grid Time Entry
This section provides solutions to common
issues related to grid time entry.
A validation error says that a deduction
or an earning is required.
Q: At the bottom of the screen, a red message displays "Column 10 – Deduction
Code is required." A yellow message displays at the top of the screen"****Validation
errors! Please correct errors before continuing.****"
A:
Each selected
type requires a corresponding earning or deduction. Select a deduction
for the deduction type. Select an earning for Hours or a
Comp. type.
Sort Field 1 cannot be the same as Sort Field
2.
Q: When
I click on next on the first page of the setup, a red message displays:
"Sort Field 1 cannot be the same as Sort Field 2."
A: Two
sort field selections are the same. Change one and make sure not to duplicate
the sort field selections.
I cannot return
to Page 1 of the Setup.
Q: I
cannot return to the first page of grid time entry to define the columns
and defaults.
A: Click
on the Back button, to return to a panel with the Start Over button. Click
on Start Over.
