Open topic with navigation
Resume Upload
Candidates can submit resumes through candidate self service,
or recruiters can save resume text for candidates from resumes submitted
in other formats. Any resumes or cover letters for a candidate are listed in the
Resumes section of the Candidate Profile.
For Recruiters: To view a candidate's resume or resumes, go to the Recruitment
menu option, and choose Candidate Profile. Select the applicant from the
upper navigation bar. To review a resume, click on its View link. If a current candidate has submitted a resume via email or
another method outside the system, you can add the resume to the candidate's record.
Add a Resume
For Candidates: Optionally, copy
and paste text into the rich-text editor. You may also type in the resume
and can use the controls to change the formatting. Save to keep the resume
information.
After the initial resume has been submitted, optionally add another resume from your profile by clicking on the plus button in the Resumes section.
Note: For
a paper resume, optionally scan it first then use OCR software to extract
the text.
- Either copy and
paste text into the rich-text editor or type the resume.
- To copy text, select
the text in the source document, and press the Control key (or Command
key for a Mac®)
and C.
- To paste the text
into the Resume Text, click in the Resume Text section, and press the
Control key (or Command key for a Mac®)
and P.
- Optionally, use
the controls to change the formatting.
- Click on the Save
button, and click on OK to complete the save and close the window.

Online Resume Self-Service
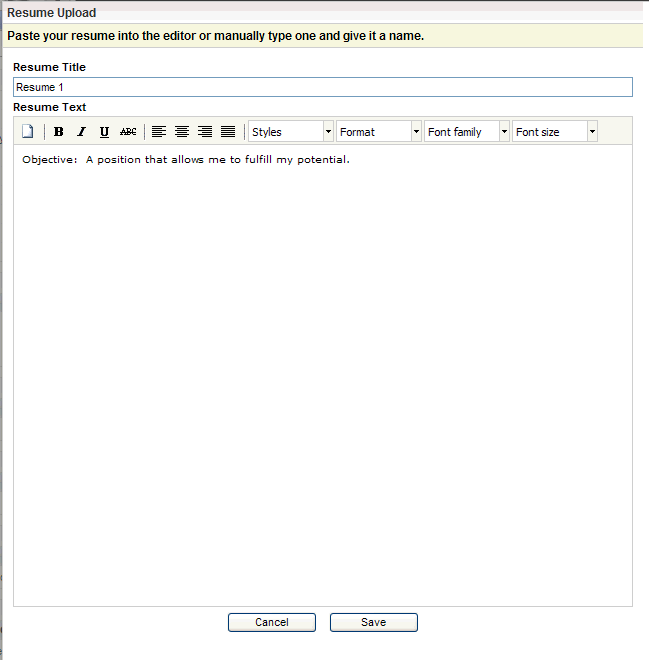
Parts of the Resume Upload Window
- Resume
Title. Enter
a title for the resume.
- Resume
Text. Optionally,
copy text from a resume document and paste text into the rich-text editor.
You may also type in the resume and can use the controls to change the
formatting.
- New
Document. Click
on the new document button to clear the contents in the rich text navigator.
- Bold.
Click on
the bold button to turn bold text on or off for the selected text.
- Italic.
Click on
the italic button to turn italicized text on or off for the selected text.
- Underline.
Click on
the underline button to turn underlining on or off for the selected text.
- Strikethrough.
Click on
the strike through button to turn the strike through formatting on or
off for the selected text.
- Styles.
The styles
option is not enabled.
- Format.
The format
selections are Paragraph, Address, Preformatted, and Heading 1 through
Heading 6.
- Font
family. The
font family selections are Andale Mono, times, Arial, helvetica, sans-serif,
Arial Black, avant garde, Book Antiqua, palatino, Comic Sans MS, Courier
New, courier, Georgia, Helvetica, Impact, Chicago, symbols, Tahoma, arial,
Terminal, monaco, Times New Roman, Trebuchet MS, geneva, Verdana, Webdings,
and zapf dingbats.
- Font
size. The
font size selections are 1 (8 pt), 2 (10 pt), 3 (12 pt), 4 (14 pt), 5
(18 pt), 6 (24 pt), and 7 (36 pt).
- Save.
Save to
keep the information entered or modified since the last save. When you
click on the Save button, you are prompted to confirm that you want to
save. Click on OK to complete the save and close the window.
- Cancel.
Cancel
to discard any changes made since the last save. When you click on the
Cancel button, you are prompted to confirm that you want to close the
window without saving. Click on OK to close the window without saving.

